Introduction[]
There are several ways to get shafts to your crossbow bolts. Many people seem to use relatively affordable factory-made round dowels. At least here in Finland these dowels are usually of birch or pine. Birch is much harder and heavier than pine. The quality of these dowels varies, so selecting only those with straight grain and no knots is essential. This of course takes time and even when carefully selected they are not usually perfectly straight. Also, as factory products they lack the character of bolt shafts made from scratch.
In case you want to make your own shafts, there are a couple of other other methods beside planing described here. One way to is to turn the shafts on a lathe. Having tried this a few times I found the process to be rather slow and the results were uneven. You definitely need a very wide blade at least for finishing the job or the shaft surface will be left very uneven. Another method which I'm not familiar with is pushing a roughly formed shaft through a series of successively smaller steel plates with cutting edges. This method is somewhat similar to the typical technique used for making wire. Although I prefer planing because of it's simplicity, speed and uniform results, bolts that are thicker in the middle than at either end have to be made on a lathe. This kind on bolts were apparently in wide use during the Middle Ages (FIXME: add references)
Making the planing board[]
Although it's definitely possible to plane the bolts without a special planing board, it would be much, much slower and require different techniques than those described here. The basic idea of the board is show in the picture below:
The board is made up of three separate pieces: a strong board that serves as a base, two side pieces and a stopper. The base board has to be relatively straight looking down it's narrower side. Alternatively you can use plywood as a base. Plywood base has the advantage that you can easily fit several side pieces and stoppers to the same base, if you want to make bolts of differing thickness or side profile as in below picture:

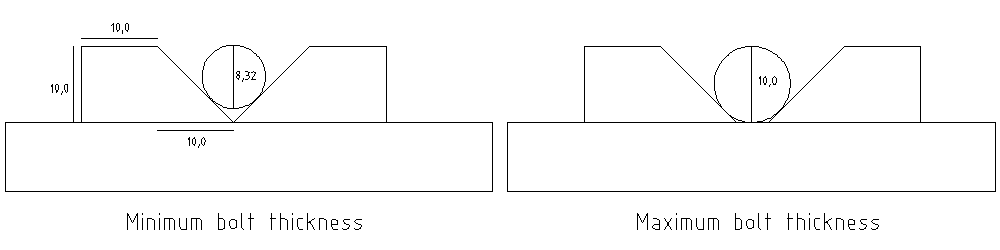
Side pieces can be made from pretty much any wood. Use a circular saw to cut two rectangular moldings from thin board (e.g. 2x1 units wide/high). Then plane one side of each to a 45 degree angle. The thickness of the moldings varies depending on the bolt thickness you require. Maximum thickness of the bolt shaft will be roughly equal to the height of the molding. It applies if you leave enough gap between the side pieces for the shaft to touch the base board. Minimum thickness applies when the side pieces are right against each other. In straight, non-tapering shafts minimum thickness should be around ~83% of the maximum thickness (see picture below).
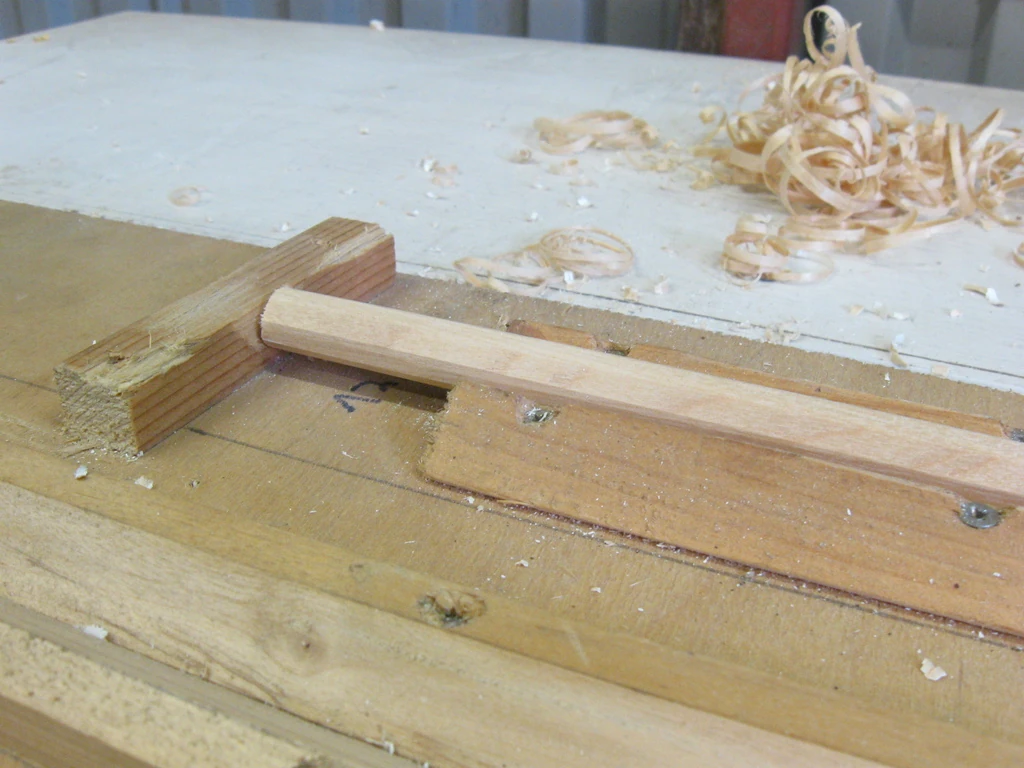
In tapering shafts minimum thickness is difficult to estimate. If the side pieces are in placed in the configuration shown in the photograph below, minimum shaft thickness will less than 83%. The only explanation for this that I can think of is that the thinner end of the shaft raises above the molding when being planed. The end result is minimum thickness of ~67% instead of ~83%, which is in most cases too little. The easiest way to fix this overly aggressive tapering is to place the side pieces a little apart even at the thin end.
Here are some concrete examples to help you get started:
| Side piece height | Bolt thickness (min) | Bolt thickness (max) |
|---|---|---|
| 17,0mm | 14,1mm | 17,0mm |
| 16,0mm | 13,3mm | 16,0mm |
| 15,0mm | 12,5mm | 15,0mm |
| 14,0mm | 11,6mm | 14,0mm |
| 13,0mm | 10,8mm | 13,0mm |
| 12,0mm | 10,0mm | 12,0mm |
| 11,0mm | 9,1mm | 11,0mm |
| 10,0mm | 8,3mm | 10,0mm |
| 9,0mm | 7,5mm | 9,0mm |
| 8,0mm | 6,6mm | 8,0mm |
| 7,0mm | 5,8mm | 7,0mm |
Here's a real-life example of a planing board configuration which results in tapered shafts:

Planing technique[]
Once the planing board is finished, not much technique is required. If you start with a rectangular (or irregular) piece of wood, plane it into roughly circular shape. Then place it into the planing board (against the stop), give one side a strike with the plane, rotate the shaft slightly, strike again and so on. Do this until the shaft is perfectly round. If you want to save time, have two planes available: one with the planing iron set deep (to remove a lot of wood) and one which is set low (for finishing). Also remember that if you're making tapered shafts you must always strike towards the tapered (thinner) end of the shaft or the wood will split.